How To Create Configurable Product in Magento 2
According to Magento docs,
A configurable product is a collection of a separate simple product with unique SKU.
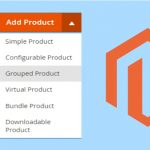
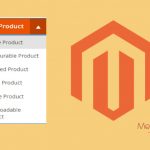
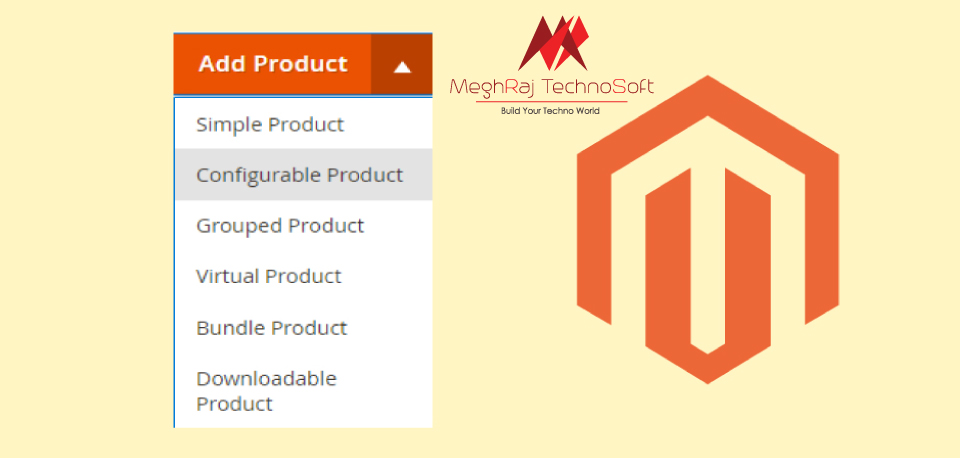
There are six product types in Magento 2:
- Simple Product
- Configurable Product
- Grouped Product
- Virtual Product
- Bundle Product
- Downloadable Product
Configurable products allow customers to choose options (Ex: shirt colour). You need to create a simple product for each configuration (Ex: a product for each colour).
Each option of configurable product is actually a separate simple product with a personal SKU, which makes it possible to track inventory for each product variation. One can achieve a similar effect by using a simple product with custom options but without the ability to track inventory for each variation.
Most products have different colours, sizes, prices, and weights. Even the prices of some of them are different according to the colours also.
An example of a Magento2 configurable product is clothing, technical devices, and any kind of product which has different options.
Follow the below steps to create configurable products in magento2, and offer the customer to choose the best option according to their choices!
Or you can simply Create Configurable Product Programmatically in Magento 2!
Steps to create configurable product in Magento 2:
Part1:
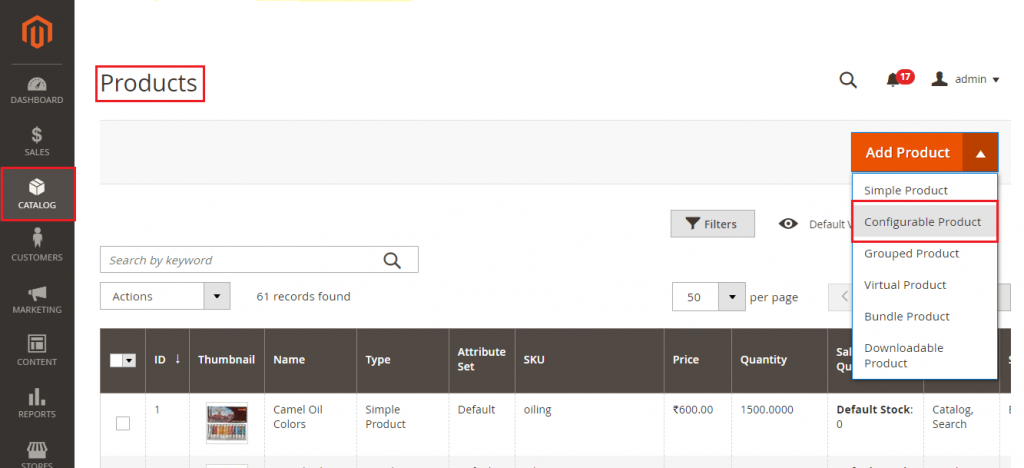
- Login to admin panel
- Navigate to Catalog > Products
- Under the Add Product menu, select Configurable Product in the upper right corner.
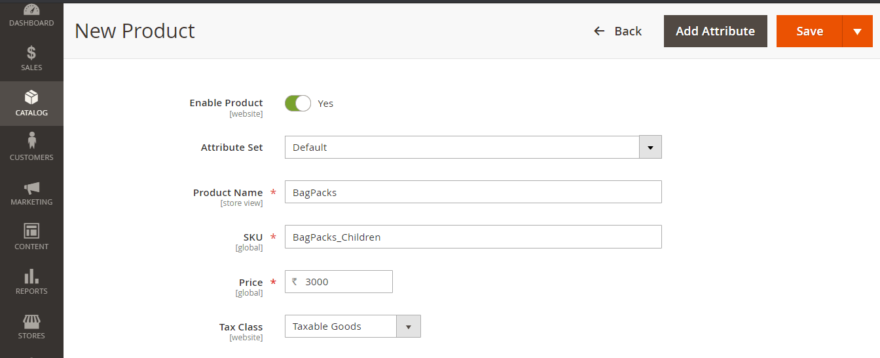
Fill the below details after enabling the product
- Attribute Set – Select the attribute set as default or create an attribute set.
- Product Name – Enter the product name.
- SKU – Enter the SKU of the product. However, Magento takes the product name as the default SKU.
- Price – Set the price of the product.
- Tax Class – Select None or Taxable Goods.
- Quantity – Enter the quantity of the products that are currently in stock.
- Stock Status – Set the stock status accordingly. Here, the default value is In Stock.
- Weight – Enter the weight of the product.
- Categories – Assign categories to the product using Select box and choose the existing category or create a new one.
- Set Product As New From – Set the dates to feature the product as new.
- Country of Manufacture – Select the country name from the drop-down.

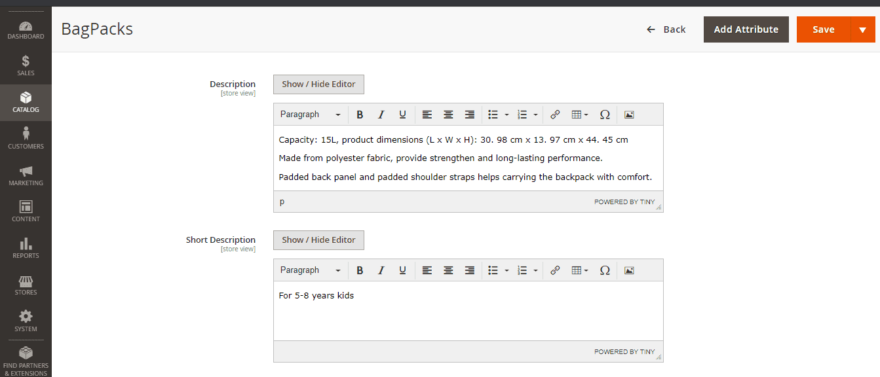
Content
- Description – Enter the main product description for displaying on the product page.
- Short Description – Enter the short description, mainly for the RSS feed or product page, catalog page, etc.
Part 2:
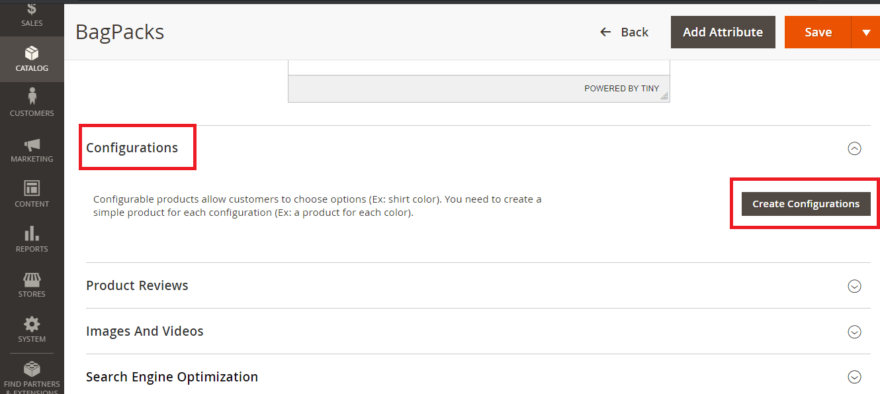
Adding configurations
Adding configuration is the main part of the configurable product. We will add three colours of the backpack with different prices.
- First of all, expand the configuration tab and click on create a configuration button.
- Create a new attribute or select from the list.
- Follow the steps that the progress bar at the top of the page shows.

- Select an attribute that you have created and click on the Next button which is located at the top right part or if you don’t have any attribute then follow the steps of the Create New Attribute option.
- Here, in this product, Let’s add a colour attribute.
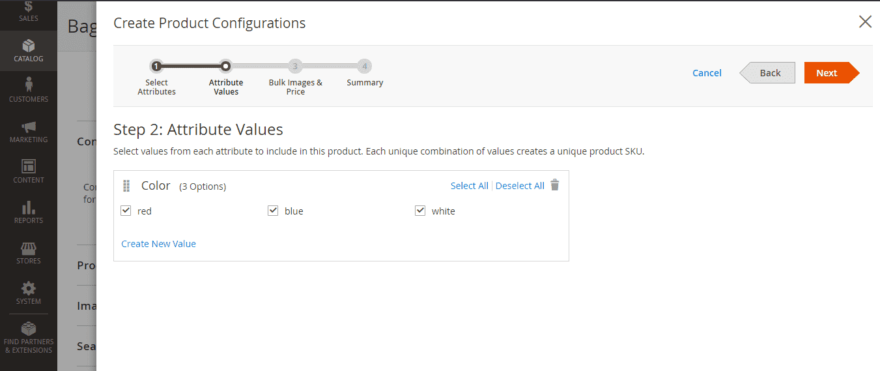
I’ve added Attribute values to my configurable product and added the colour red, blue, and white.
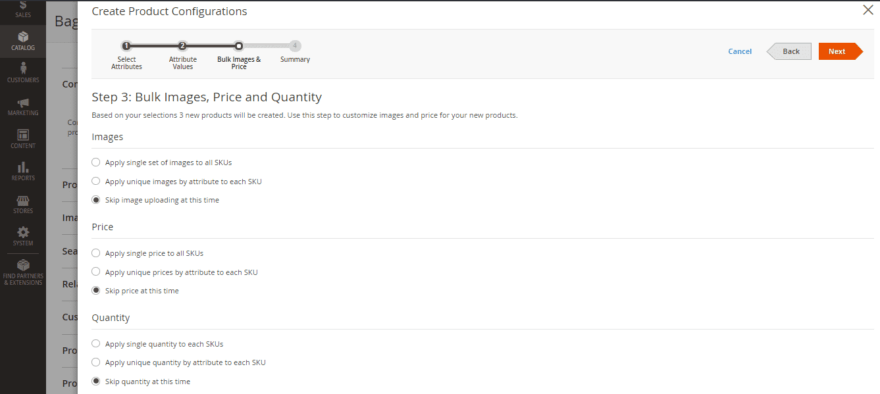
- It has three options: Images, Price, and Quantity. which in turn has three options each.
IMAGE RELATED OPTIONS:
- Apply a single set of images to all SKUs:
If you want to apply the same image to every option then select this radio button.
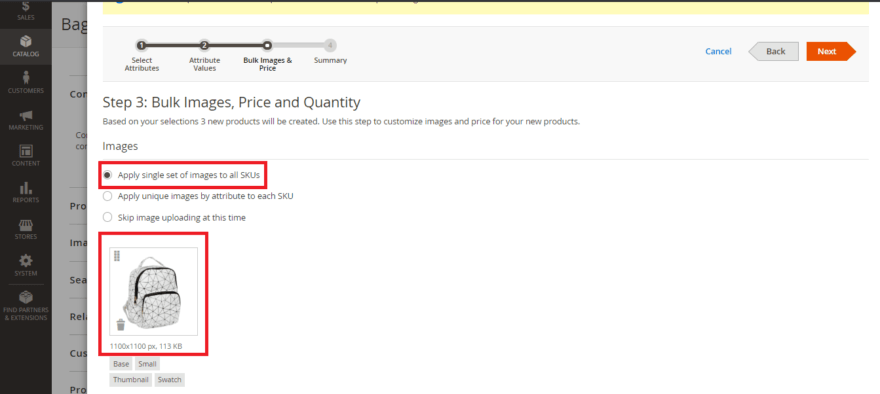
This image will remain constant in every SKUs
- Apply unique images by attribute to each SKU
This option allows you to set different images by our attributes.
Here, I’ve colour attribute and if the customer chooses red then a red colour product will be displayed.
- Click on that radio button and select one attribute from Select attribute dropdown.
- Add attribute wise images.
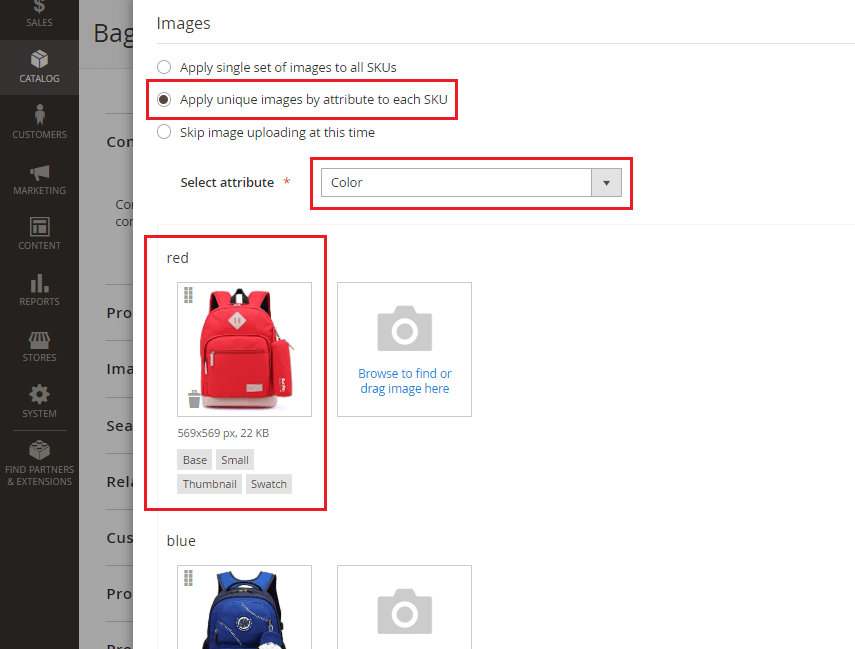
Skip image uploading at this time
If you don’t want to upload any image at this time, then select this option.
PRICE RELATED OPTIONS:
- Apply single price to all SKUs
If you want to add a single price to all options or SKUs then select this radio button and enter the price that will remain the same in all SKUs.
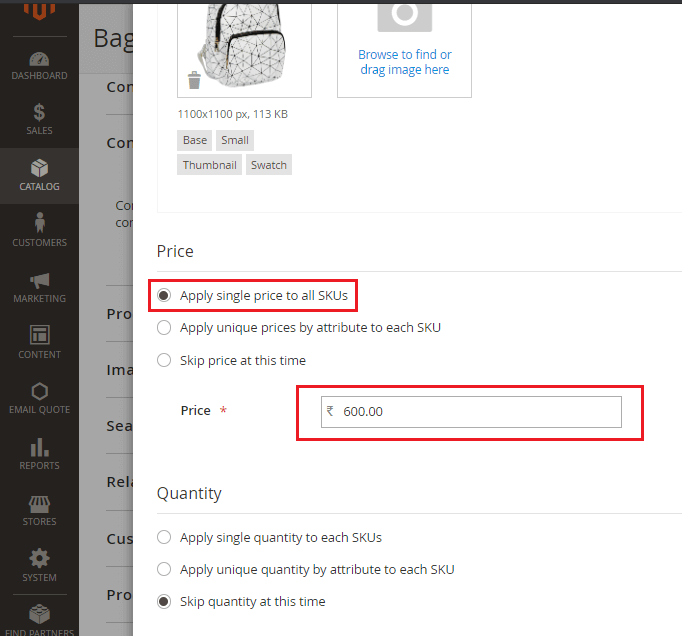
- Apply unique prices by attribute to each SKU
Same as the image-related options, it allows us to add different prices for unique SKUs. If the particular product of your store is very popular, then use this option.
For example, the golden colour of a particular mobile is unique and easily not available in the market then the prices of this colour will definitely be high and this option is exactly for that situation.
- Select this radio button and it will display one dropdown for the attribute.
- Choose the attribute that you want to apply.
- And the very next step is just to apply prices for different options.

Skip price at this time
If you don’t want to add the price of the attribute this time then it will not ask for the price.
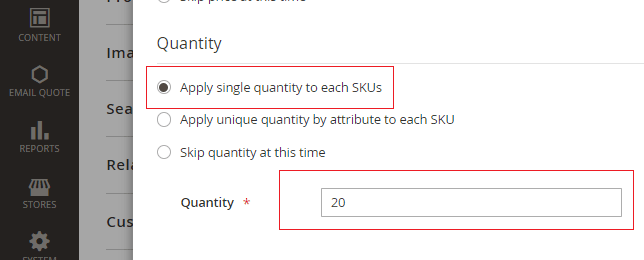
QUANTITY RELATED OPTIONS
- Apply single quantity to each SKUs
Same as the other two options, if you want to apply a single quantity for all attributes then select this radio button and enter the quantity that will remain the same for all SKUs.
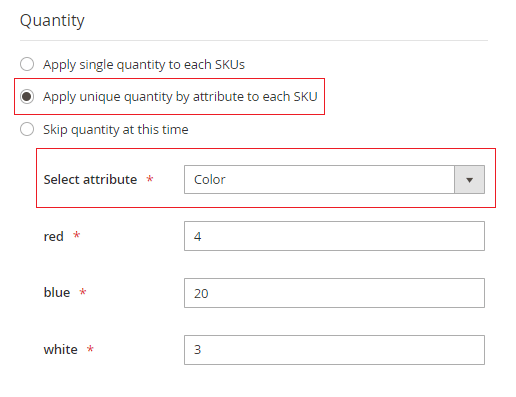
Apply unique quantity by attribute to each SKU
If you have a very limited quantity of the most demanded coloured item and quite more quantity of another attribute, then use this option to differentiate them.
- Select this radio button.
- Choose an attribute of the product.
- Enter the quantity of each colour.
Skip quantity at this time
As the name suggests, if you want to skip entering quantity then select this radio button.
- Click on the Next button from the right top of the page.
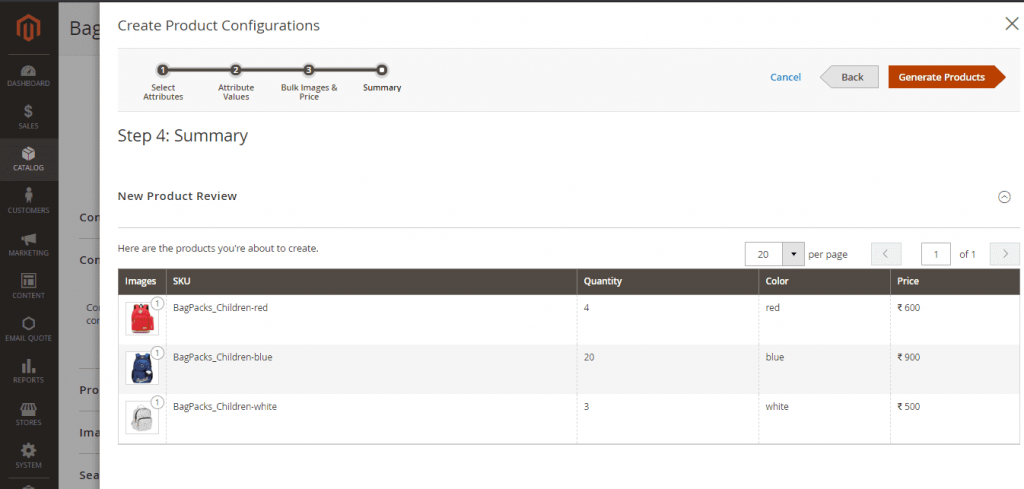
- In summary, you can view the final record. If you want to change any of them then the back button is there for you!
- Click on the Generate Products button.
Part 3:
Images and Videos
- Add images and videos to display on the product page using the popup or drag-drop functionality.
- Here, in a configurable product, this image will display as the main product image, when a user clicks on this product the attribute displays.
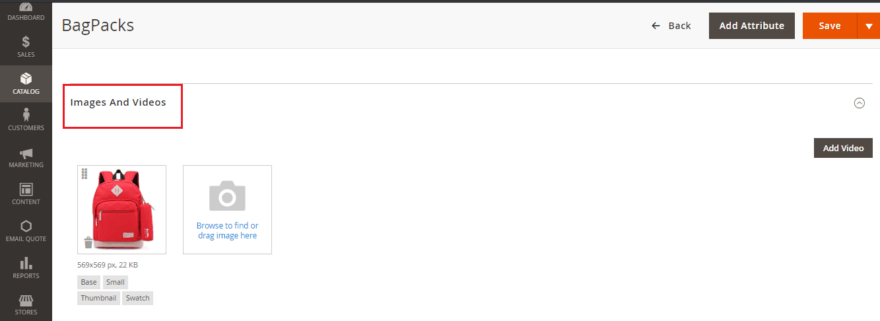
Click on the image to fill up the details like Alt Text and Role:
- Alt Text – Enter the content to describe the image or to display in the case when the image is not loaded.
- Role
- Base – Main image for the product page
- Small – Image for listings on category and search results pages, and for sections such as for Up-sells, Cross-sells, and the New Products List.
- Thumbnail – Images for thumbnail gallery, shopping cart, blocks like related items
- Swatch – Used to illustrate the color, pattern, or texture.
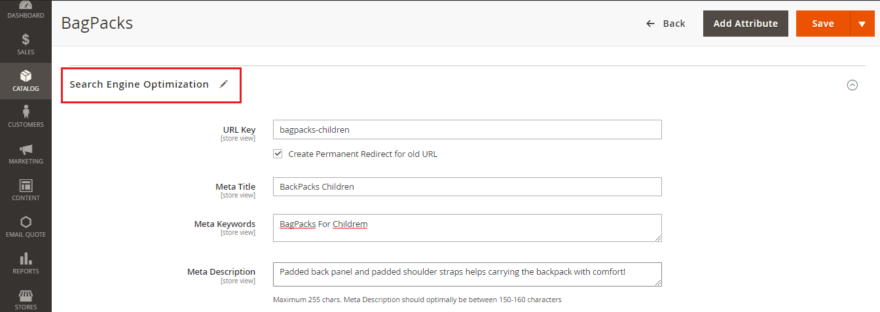
Search Engine Optimization
- URL Key – Enter the URL key for the online address of the product
- Meta Title – Enter the title for the display in search results. The default meta title is based on the product name.
- Meta Keywords -Add relevant keywords for more visibility in search results.
- Meta Description – Enter the description of the product for display in the search results.
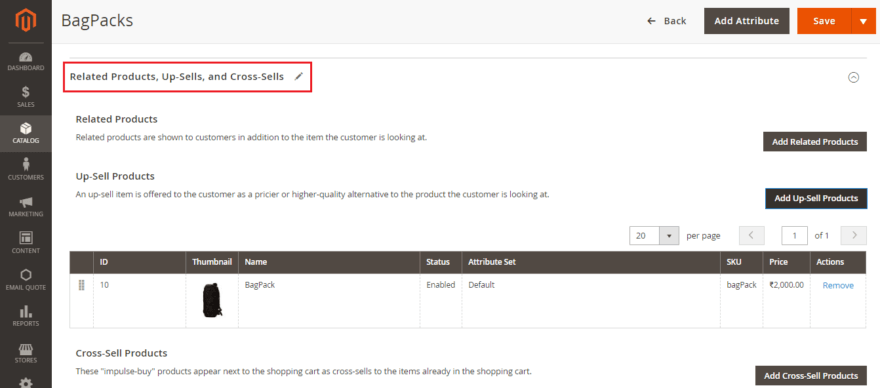
Related Products, Up-Sells, and Cross-Sells – Used to promote other products in the store
- Related Products – Add products that are supposed to be purchased in addition to the item the customer is viewing.
- Up-Sells Products – Add products that are similar to the product that you are creating but probably higher quality
- Cross-Sells Products – Add products that are offered on the shopping cart page as last-minute purchases before the checkout process begins.
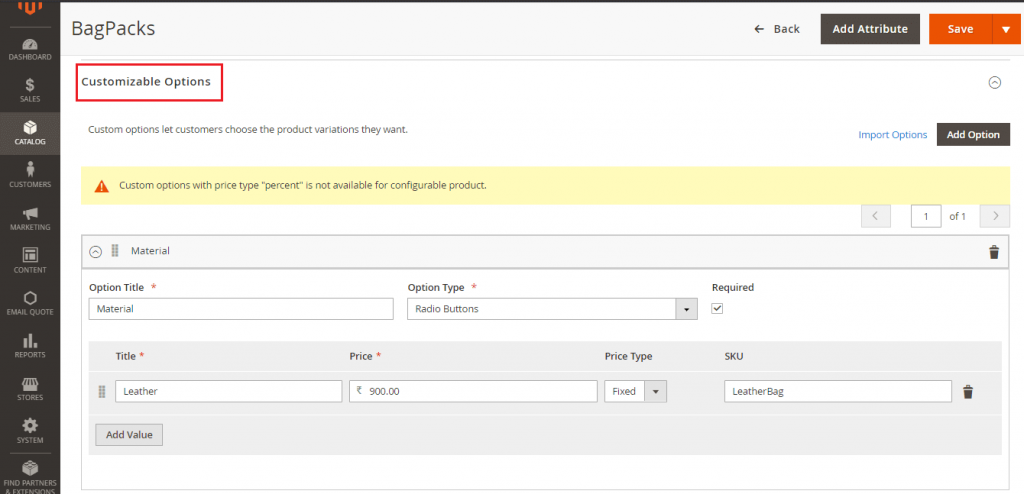
Customizable Options
Configure this option to offer customers a selection of options with a variety of text, selection, and date input types.
Custom options with price type “per cent” are not available for configurable products.
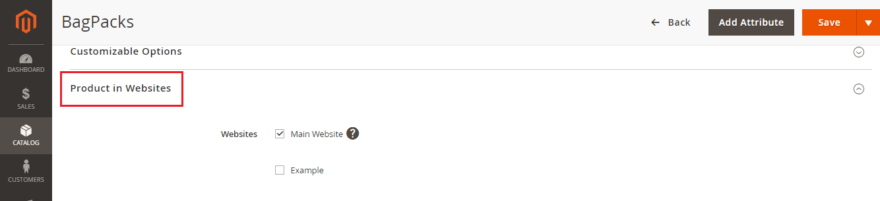
Products in Websites
Select the option where the product is available as per the store hierarchy. By default, for a single website installation, the website checkbox is marked.
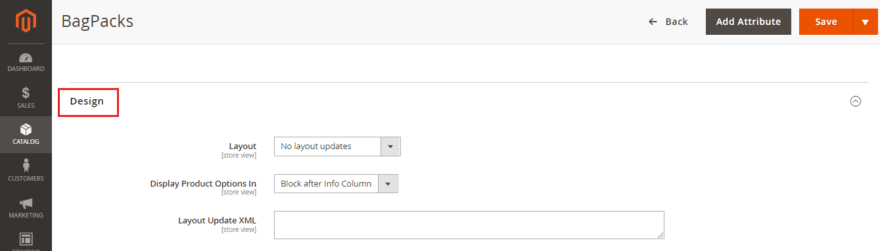
Design
- Layout – Choose a layout from the dropdown.
- Display Product Options In – Select where the product options appear on the product page from the drop-down menu.
- Layout Update XML – Enter XML code in case of customizing the theme.
That was all about configurable product type in Magento 2.
Once you follow these steps, you can see the Magento 2 configurable product in the frontend as below:

That’s it.
A bit lengthy but your starter guide to creating Magento 2 configurable products!
Feel free to mention your doubts on this topic in the Comments section below. I’d be more than happy to lend a helping hand 🙂
Do share the tutorial with beginners in Magento 2 via social media.
Thanks.